Written collaboratively by Christina Bakker, Amanda Blair and the South Dakota Animal Industry Board.
This article is intended to provide guidance on the proper techniques for fabricating a pork carcass at home. If done correctly, it will aid in ensuring personal safety and meat product safety. If not done correctly, there are significant risks to personal safety and meat safety.
Getting Started
Before beginning the fabrication process, you should be confident in your ability to sharpen and handle knives and saws. A dull knife is much more dangerous to use than a sharp one because dull knives require more pressure to cut, increasing your chances of injury.
We recommend viewing this video produced by Dr. Gregg Rentfrow, our meat science colleague at the University of Kentucky. This video thoroughly demonstrates the step-by-step processes involved in fabricating a pork carcass into primal cuts and retail cuts.
A few notes:
- Make sure to start with sharp knives and be prepared to use a steel as needed to keep a good edge on your knife.
- Have materials ready for wrapping your cuts (vacuum bags, butcher paper, etc.), containers for trim that can be utilized for ground pork or sausage, and a container for inedible items to be discarded.
- Ensure you have boiling water prepared to sterilize your knives before you begin and throughout the processes as needed if your knife becomes contaminated.
- When skinning, you may want to keep your knife at shallower angle than what is shown in the video if you intend to use the fat in trimmings to make sausage or would like to make lard.
- For all cuts using a saw, saw through the bone then finish separating the cut with a knife. This will make your cuts much cleaner.
Cutting the Carcass Into Primal Cuts
A side of pork is first broken down into primal cuts (picnic shoulder, Boston butt, loin, belly, ham). Use Figure 1 as a guide to help you make these cuts. Lay one side of the carcass down on a clean surface so the skin side is down. If you do not wish to keep the feet, they can be cut off using a saw above the knee or hock joint of each leg. Then, locate the 2nd rib counting from the anterior end (closest to the head). Using a saw, cut through the backbone and sternum between the 2nd and 3rd ribs. You will also have to saw through the shoulder blade which lays below the backbone. Once you have cut through the bones, you can finish removing the shoulder with a clean boning knife.
Once the shoulder is separated from the rest of the carcass, it can be further separated into the Boston butt and picnic shoulder. Position the shoulder so the cut side is closest to you. Using your saw, separate the two primals at a point 1 inch toward the leg from the bottom edge of the blade bone. Your saw blade should rest slightly below the vertebrae of the backbone.
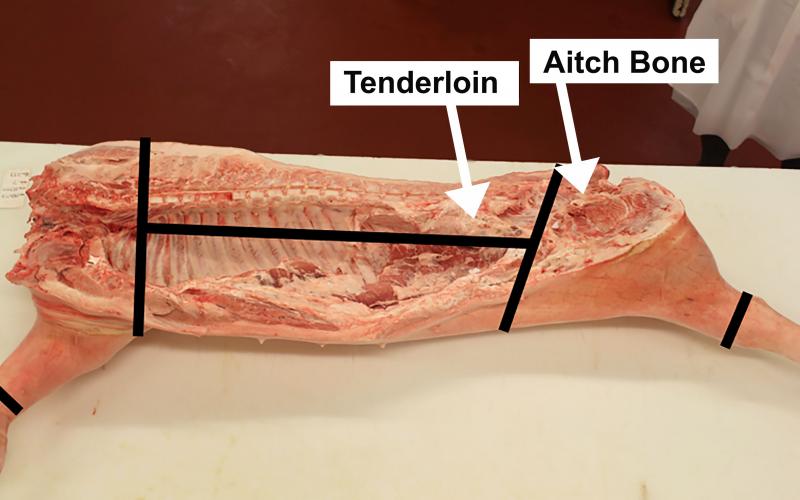
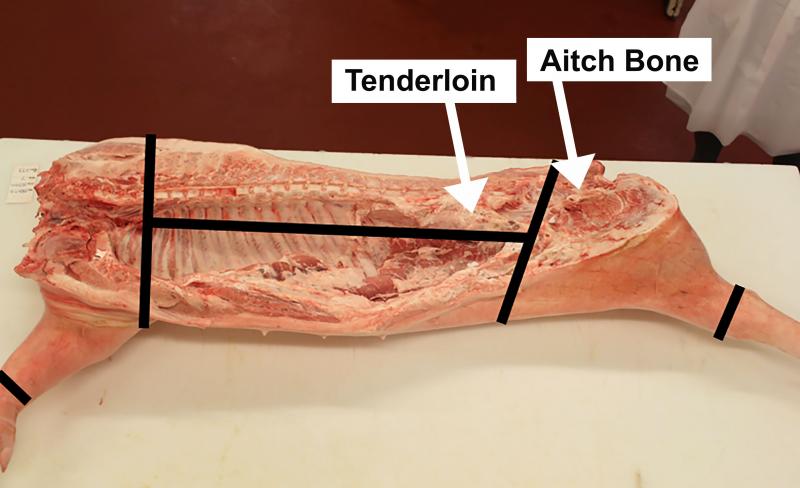
Next, locate the aitch bone, which is a teardrop shaped bone at the ham. Using a saw, make a cut perpendicular to the length of the back leg about 2 inches towards the head from the aitch bone. You will cut through the last few vertebrae and the pelvic bone. Again, once you have cut through the bones, finish the cut with the boning knife.
Finally, separate the belly from the loin. Start by looking at the end the ham was removed from. Locate the tenderloin, which is a small round muscle that sits just under the backbone. At the ham end, make a mark at the edge of the tenderloin. Then, on the shoulder end of the loin, locate a spot about 1-2 inches toward the belly from where the ribs meet the backbone and make a mark. Then return to the ham end. Using a knife, cut towards the mark you made on the shoulder end. You should get about half-way through the cut before reaching the ribs. Then, use a saw to cut through the ribs and finish the cut with a knife.
Once these primal cuts are made you can further process them for your specific needs.
Retail Cut Fabrication
Belly
- Skin the belly. Be sure to keep your knife as close to the skin as possible. It should be so shallow that you can see the blade of the knife through the skin. If you get too deep, you will waste product.
- Remove the spareribs. Flip the belly so it is rib side up. Begin removing the ribs by placing your knife parallel to the table and cutting directly under the ribs. If you cut too deep, you will have meatier ribs but thinner bacon. We recommend staying as close to the ribs as possible. The spareribs are a half teardrop shape. Think about how your ribs sit in your body, they curve at the bottom. The same thing is true for a pig. As you get closer to the ham end, the ribs get shorter. At the blade end of the belly, (towards the head of the pig) the ribs span the whole width of the belly and connect to the sternum. Separate that side of the ribs from the belly first. You should then be able to follow the shape of the ribs as you move towards the ham end. Take your time, you may have to make progress on the loin side of the belly before you can see where the ribs meet the sternum. Be careful to not leave any cartilage on the belly. Cartilage is hard and pearly white compared to the dull white of the fat.
- Remove the sternum from the spareribs but cutting through the cartilage between the sternum and ribs.
- If necessary, remove the leaf fat from the ham end of the belly. It is the fat that sits on top of the lean that can be easily peeled off.
Loin
Bone-in:
- Skin the loin. Trim the backfat to about ¼ inch.
- Remove the hanging tender and diaphragm muscle. These are the flaps of meat connected to the backbone about halfway down the loin.
- Bone in chops of your preferred thickness can now be cut from the loin using a bone saw, or you can proceed to steps 4 through 9 to make the loin boneless.
Boneless:
- Remove the tenderloin by cutting very closely to the backbone and peeling it out.
- Clean the tenderloin of most of the fat. Anything that is not the main tenderloin muscle can be removed and put into trim.
- Remove the sirloin using a bone saw. This is where the ham end of the loin gets thicker. Cut between the last and second to last lumbar vertebrae. Lumbar vertebrae are the ones that are still parallel to the length of the carcass before they angle up towards the tail.
- The sirloin can be boned out and put into trim for grinding, boned out and left as a roast, or you can leave the bone in and make sirloin chops with a saw.
- Remove the back ribs from the loin. Start on the bottom of the loin where the ribs are exposed. Keep the knife as close to the rib bones as possible. Once you are past the ribs, you still need to go around the vertebrae. They have protrusions that are about half the height of ribs. Once you get down to the backbone, flip the rib over and make a cut directly next to the backbone removing the loin muscle from the bones.
- The loin will still have a piece of the shoulder blade on the end opposite of the sirloin. The portion containing the blade bone can be removed and then the loin can be fabricated into boneless chops or roasts as desired.
Boston Butt
Remove the skin and trim the fat to about ¼ - ½ inch. Remove neck bones and vertebrae if they are not already removed.
The Boston butt can be used for pulled pork or it can be cut into pieces to be ground for trim.
Ham
Bone-in:
- Remove tail bones.
- Remove fat and lymph glands on the side of the face opposite of the tail bones.
- Remove the skin from the ham.
- Remove the aitch bone. The aitch bone attaches to the head of the femur and is also the piece of bone you see in the ham face. The femur that attaches to the hip joint has a strong ligament in the middle so you will need to cut through that. Once you have loosened the hip joint, continue to follow the aitch bone with your knife and remove it from the ham. You can leave the ham like this if you want or proceed to step 5 to make it completely boneless to have a boneless ham or to make deli ham.
Boneless or Deli:
- Trim the fat from the ham so you can see the muscles. There are 4 main muscle groups in a ham. Follow the seams, starting with the one visible from the top of the ham near the head of the femur. This seam will remove the muscle that sits on the top of the ham and it is the largest of the ham muscles. Next, find the small muscle that is long and narrow and sits on top of the remaining muscles near the edge of the ham. Trace the seam surrounding it to remove that muscle. Then, find the muscle that is on the opposite side of the femur bone from the muscle you just removed. Use your knife to trace along the femur until you find a pocket of connective tissue below the femur and peel the muscle away from the ham. Finally, separate the remaining muscle by cutting below the femur. A muscle group surrounds the hock and will stay with the bones. Find the seam where the hock muscles meet the final ham muscle and separate that seam with your knife. Finally, separate the muscles surrounding the hock and cut them to pieces to use for trim.
Picnic Shoulder
The picnic shoulder can be skinned and put on a smoker or cooked whole to be used for pulled pork.
If you do not want to make pulled pork, cut the meat from the bone and it can be ground for sausage or ground pork.
Additional Resource
Video: How to Butcher a Pig: Entire Breakdown, Step by Step, The Bearded Butchers.