Written collaboratively by Amanda Blair, Christina Bakker and the South Dakota Animal Industry Board.
The COVID-19 pandemic has caused supply chain disruptions for nearly every commodity, including the swine industry. This has left many producers searching for alternative strategies to market their livestock and consumers seeking alternative options for sourcing meat. One option that can be considered is butchering pigs at home. Producers with market ready hogs can sell live pigs to consumers to slaughter and process at home.
This guidance is intended to instruct on the proper techniques for slaughtering pigs at home and, if done correctly, will result in humane slaughter, a safe meat product, and a safe working environment. If not done correctly there are significant risks to personal safety, animal welfare and meat safety.
Skills Needed
Before making the decision to slaughter a pig at home, there are several important skills that you should possess:
- Firearms: You should have the skills necessary to handle and fire a gun safely. Most people prefer to use a .22 caliber rifle when butchering at home. You should be able to safely and accurately fire the gun to ensure the animal is stunned properly and humanely.
- Knives: You should be confident in your ability to sharpen and handle knives and saws. A dull knife is much more dangerous to use than a sharp one because dull knives require more pressure to cut, increasing your chances of injury.
- Animal Handling: You understand humane animal handling and the ability to safely restrain the pig or keep it in a small area. If the pig is able to move around, it is much harder to safely and humanely stun the animal.
- Patience: You should have the patience and attention to detail to follow all of the necessary steps to safely handle the animal, carcass, and meat to reduce the chances of animal welfare or food safety issues.
Essential Equipment
If you have determined that you have the skills necessary to slaughter and butcher a pig yourself, the next step is to conduct an inventory of equipment. Depending on your decision to skin or scald the carcass, you may not need some of the listed equipment.
- Firearm for stunning the pig and ensure the firearm is sighted in for the appropriate range.
- Several sharp boning knives. We recommend at 6-inch blade.
- Metal barrel or other container to heat water. Note: You will need a significant amount of water.
- A heating source for heating water to 150 °F.
- Strong rope, chain, or gambrel.
- Tractor or pulley system to hoist the carcass into the air.
- Buckets or large bowls for scalding.
- Skinning knife or bell scraper.
- A place to put the meat to cool.
- This can be coolers with ice, a refrigerator that is empty and clean, or other place you can store the meat to ensure it gets below 40°F as quickly as possible.
- A clean bone saw or reciprocating saw.
- Container for inedibles and proper disposal.
- Butcher buddy - For safety reasons, don’t do this solo.
Once you have gathered the necessary equipment and people to assist, it is recommended to withhold feed from the animal(s) for 12-24 hours prior to slaughter. This reduces the chance of contaminating the carcass with fecal matter and makes gutting much easier. If you withhold feed, make sure the animal(s) are supplied with plenty of clean water at all times.
Steps for Hog Slaughter
Step 1: Check the weather.
The cooler the temperature is outside, the quicker the carcass will chill. Start early in the morning and try to avoid exceptionally hot days. If butchering out of doors, remember windy days can introduce dirt, debris, field chemicals, insects, etc.
Step 2: Heat the water.
If you chose to scald the carcass, get the water heating. Cleaned metal drums work well for scalding. When filling the drum, remember that the carcass will displace a lot of water so only fill the drum about 1/2 - 2/3 full. If there is too much water, the drum will overflow and possibly put out your fire. If you do not have a large enough container to dip the carcass into, heat as much water as you can. The water will need to be about 150°F. If you are choosing to skin the carcass, you do not need as much hot water, but you will need enough to clean your hands and equipment when necessary.
Step 3: Set up your equipment.
Make sure to know where all of your equipment is so you can work efficiently. Go through the slaughter process and set up your stations accordingly. Being organized will help make this process go much more smoothly. If you intend to use a tractor and loader for hoisting the carcass, make sure the loader is clear of any loose debris that could fall onto and contaminate the carcass.
Step 4: Move the hog into the area where you will stun it.
If you have more than one pig, separate them so you only need to worry about one at a time. It may be helpful to do this on a slight incline so when exsanguinating, the blood runs away from your work area. The stunning area should be small enough that the pig cannot run away from you and you can get close enough to get a clear, accurate shot.
Step 5: Stun the pig.
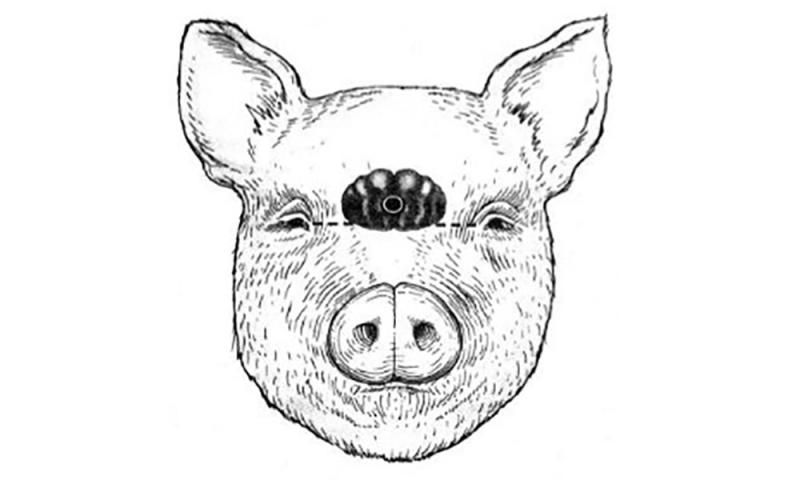
You want to aim for the brain, which can be found by drawing imaginary X from the top of the base of the ear to the opposite eye or about 1.5 inches above the eyes in the center of the forehead. You may find it beneficial to put a small amount of feed on the ground to entice the pig to stand still. The goal is to stun the animal with one shot, use patience and wait for a clear shot. However, it is important to have a backup round ready in the first shot does not go as planned. Once you have stunned the animal, check for signs of consciousness. When an animal has been properly stunned, they will not blink if you touch their eye, they should not vocalize, their head should hang limply, and there should be no rhythmic breathing.
Step 6: Exsanguinate (bleed the animal).
After the animal is stunned, the front and back legs will likely begin to kick rapidly. This is normal. It is caused by the disruption to the nervous system caused by the stun, not a sign of consciousness. It is important to be careful when exsanguinating because these movements after stunning can be unpredictable. Always be aware of where your knife is. Roll the animal over so you have access to its underside. Use your fingers to find the sternum bone between the front legs where the ribs meet. Trace the sternum towards the head to find the end of the sternum. Insert your knife behind the sternum with the tip of your knife pointed towards the tail and the sharp side of the blade towards the backbone of the animal. The knife should be parallel to the sternum but behind it. Once the knife is fully inserted so the handle is up to the skin, flick your wrist so the blade is at about a 45-degree angle from where it started and draw the knife back out. If done correctly, blood should exit the body rapidly, if it does not, reinsert the knife and repeat the motion. This motion severs the carotid artery and the animal will bleed out quickly.
Step 7: Hang the carcass.
This is where a tractor may come in handy as you want the carcass to be completely off the ground. There are a couple ways you can hang a carcass. You can use a thick rope or chain around the hocks. Be sure to get the chains behind the dewclaws (closer to the ham). Exercise caution if you chose to use this method as the carcass could slip from the shackles. You can also use a gambrel if you have one and make an incision parallel to the length of the leg on the inside of each dewclaw to expose the gambrel tendon. The tendon is a pearly white color that runs from the toes to the hock joint. Be careful if you choose to hang the carcass this way. If you cut into the tendon, it may snap under the weight of the carcass and the carcass will fall. Rinse the carcass with water and a scrub with a bristled brush if you have one. This will keep the process cleaner.
Step 8: Scald.
Lower the carcass into the hot water (145-150°F). Be sure to continually move the carcass around and do not let it sit on the bottom of the tank at the heat source. Allowing the carcass to sit on the bottom too long will result in cooking the meat and skin. After a few minutes, the hair on the portion of the carcass that is under water should begin to easily peel off when you grab it. Hoist the carcass out of the water and begin scraping against the direction of hair growth with skinning knives or bell scrapers. You can lay the carcass on a sturdy table or stacked pallets or leave it hanging where you can reach it. You will want to remove as much hair as possible. You will notice that if the carcass was not white before scraping, it will be when you are done. If the whole carcass did not fit in the water, flip the carcass so it is hanging by the front legs and repeat the process. If you do not have a water container big enough to fit the carcass, drape one side of the carcass with old towels and pour the hot water onto the towels. Let the hot towels sit for a few minutes and continue to scrape as previously described. Draping the carcass in fabric can help hold the hot water in place to speed up the process. If you intend to keep the feet, use a hook to pull the toenails and dewclaws off of the foot and be sure to get all the hair out from between the toes. If at any point scraping becomes difficult, pour more hot water onto the carcass or dip it back into the vat. If necessary, a torch attached to a propane tank can be used to singe off any remaining hair. Do not put the torch too close to the carcass or leave it in one place too long to avoid burning the carcass. Once you are done scraping the carcass, rinse it down and if you have brushes, use them to ensure all the hair has been removed.
Step 8 Alternate: Skin.
If you chose to skin the carcass, it is similar to skinning a deer. It is important to avoid as much contamination as possible when skinning. When making cuts to the skin, stab through the skin with the sharp side of the knife blade pointed up and away from the carcass. This will prevent pushing any contaminants from the skin into the meat. Also, designate a “clean” hand and a “dirty” hand. Your clean hand is the hand you hold your knife with, and your dirty hand will be used to pull the hide out of the way. Do not switch or confuse which hand is which. Wash your clean hand if it ever gets dirty and do not touch the carcass with your dirty hand. Make cuts around each leg just above the knee or hock joints. You can begin from the front or back legs depending on how the carcass is positioned (hanging or laying down on a clean surface such as a tarp). Follow the leg to the center of the carcass. Open the skin down the middle of the carcass. Note: If the pig was male, you will need to remove the pizzle (penis) at this step. Consult step 10 for instructions on this. Once the skin has been opened, work from the legs to the center of the body by cutting between the skin and the fat until all the skin is removed. Some people prefer to loosen the skin around the hind legs and from the belly and then pull the skin off. This method can be faster, but it increases your chance of pulling the fat off the carcass, which can negatively impact the quality of the meat. If you do not want to keep the head, you do not need to skin it. Once you have the skin removed down to the head, move on to Step 9.
Step 9: Remove the head.
Stand so you are facing the carcass’s back. Locate the base of the skull and make a cut slightly above the skull that exposes the vertebrae. You can use a saw to sever the backbone or insert your knife between the skull and the first vertebrae to separate the skull from the backbone. Using your knife takes a little bit of skill and patience. The joint is not straight across, but rather fits together like an “m”. Once the backbone is severed, slowly continue to cut around the head until only the trachea (windpipe) and esophagus are attached. The trachea feels like a rigid structure with cartilage rings. Use your hand to locate the Adam’s Apple. This is a large, hard structure where the esophagus and trachea fuse together. Remove the head by cutting through the esophagus and trachea above (towards the tail) the Adam’s Apple. This will make the removal of the internal organs much easier.
Step 10: Remove the pizzle (barrows only).
If the pig was male, you must remove the penis or “pizzle”. Lower the carcass so you can reach the point where the back legs meet. Place your knife where the back legs meet slightly off center, and using light pressure, cut the skin open moving towards the navel. If you cut exactly down the center, you chance cutting into the pizzle and contaminating the carcass with urine. As you cut, you should see a long white structure that is about the ½ - 1” in diameter. That is the pizzle. Once you get close to the navel, carefully pull the pizzle towards you and use your knife to cut behind it to separate it from the body wall. Continue this cut down to the navel using caution to not cut into the body wall or the pizzle and separate the end of the pizzle from the carcass. Then, using the same technique, move towards the tail separating the pizzle as you go. Once you reach the point between the back legs near the anus, cut the pizzle off the carcass.
Step 11: Evisceration (gutting).
The first step in evisceration is called bunging. Stand behind the carcass so the tail is close to you. Use your knife to carefully cut around the anus. Give yourself about ½ -1” clearance around the anus to make sure you do not puncture the rectum or “bung”. You should not be cutting into the muscles of the ham, but right next to them. Once you have loosened the anus, you can grab it to move it side to side to continue cutting the connective tissues holding the bung in place.
Next, move to the belly side of the carcass. Starting where the back legs meet and hold your knife parallel to the length of the carcass, using light pressure, score the skin from between the back legs to the sternum. Then, holding your knife in the same starting position, slowly open the body cavity. Do not stab into the carcass to prevent puncturing the intestines and bladder. Once you have opened a large enough hole to insert your hand, place your hand that is holding the knife inside the carcass so the blade of the knife is outside the carcass at a 90 degree angle and the handle is inside the carcass and pressed against the inside of the body wall. In one swift motion, open the carcass down to the sternum. It is critical to not remove your hand until you have made the full cut. Opening the carcass with your knife handle inside will prevent you from puncturing any organs and contaminating the carcass. Stopping before you have reached the sternum and trying to start again drastically increases your changes of contamination.
Once you have opened the carcass, use your hands to pull the bung downwards and out of the carcass. You can use string or a zip tie to close off the anus to prevent fecal contamination. Then working slowly, continue to pull the organs forward and out of the body. You may need to use a knife to cut the ureters or heavy connective tissue. Be careful not to cut the intestines or stomach. When most of the organs are removed, you will see the diaphragm muscle with associated white-colored connective tissue separating the digestive organs from the heart and lungs. Using your hand, follow the esophagus (light pink tube about 1” wide) through the diaphragm and separate the esophagus from the trachea. Once you pull the esophagus free, the digestive organs should be easily separated from the carcass. Place the organs into a tote or other container.
Next, cut the connective tissue of the diaphragm. Use your knife to cut the large vein that runs along the backbone. Place your finger into the vein as a handle and cut between the vein and the backbone towards head of the carcass. Then, loosen the connective tissue around the heart to remove the heart, lungs, and trachea together.
Step 12: Remove leaf fat.
The abdominal cavity is lined with a large amount of fat known as leaf fat. Use your hand to separate the fat from the muscle using caution to not put your hand under the thin layer of muscle along the belly. Leaf fat can be used to make lard if desired, otherwise it can be disposed of with the other organs.
Step 13: Inspect the organs.
Take a moment to inspect the organs for any signs of illness or infection. Palpate the lungs for any hard lumps, inspect the liver for signs of parasitic infection (small white lines) or abscesses, and cut open the heart. In general, look for anything that looks suspicious. If you want to save the liver, heart, or kidneys, separate them from the rest of the organs. Remove the gallbladder from the liver and pop the kidneys by lightly scoring them and peeling back the thin membrane.
Step 14. Split the carcass.
Using a knife, cut through the pelvic girdle between the back legs. On a younger carcass, it should easily separate. If you have trouble, you can use a saw. Next, using a saw, split the sternum down the middle so only the backbone is holding the two sides together. Then, standing facing the inside of the carcass, use a bone saw or reciprocating saw to split the carcass in half down the backbone. If you have used a gambrel to hang the carcass, leave the last 12-15 inches of skin connected near the shoulders to make sure the gambrel stays balanced. If you used chains or ropes to hang the back legs independently, you may completely separate the sides.
Step 15. Inspect the carcass.
Look over the carcass for any signs of contamination (dirt, hair, fecal matter, ingesta from a punctured intestine, etc.). Any contamination should be trimmed off the carcass to reduce chances of food borne illness such as Salmonella, E. Coli or other illnesses. Many harmful bacteria thrive in fecal matter.
Step 16. Rinse the carcass.
Using hot water if possible, spray the carcass down beginning at the hind legs and working toward the front legs. Allow the carcass to drip for a few minutes. Using a clean, new spray bottle or garden sprayer, spray the carcass liberally with a 2% acetic acid wash to help inhibit bacterial growth.
Acetic acid is the acid found in white vinegar. Consult the bottle to determine the percent acid (most bottles are 5%).
Example Acetic Acid Solution:
If you want to prepare 10 liters of spray, the calculation for dilution would be as follows:
- Acid Concentration = 5%
- Final Volume = 10 liters
- Final Concentration = 2%
Volume of vinegar needed = ?
- Volume of Vinegar × Acid Concentration = Final Volume × Final Concentration
- Volume of Vinegar × 5% = 10 liters × 2%
Solve for Volume of Vinegar:
- Volume of Vinegar = (10 liters × 2%) ÷ 5%
- Volume of Vinegar = 20 ÷ 5%
- Volume of Vinegar = 4 liters
You will need 4 liters of vinegar. If the final volume is 10 liters:
- 10 liters total - 4 liters of vinegar = 6 liters of tap water
You need 4 liters of white vinegar and 6 liters of tap water to create 10 liters of a 2% acetic acid solution.
Step 17. Cool the carcass.
If you have access to a large cold room or cooler that will fit entire carcasses or sides, set the temperature to between 33 and 38°F, place the side inside, and you are done with the slaughter steps.
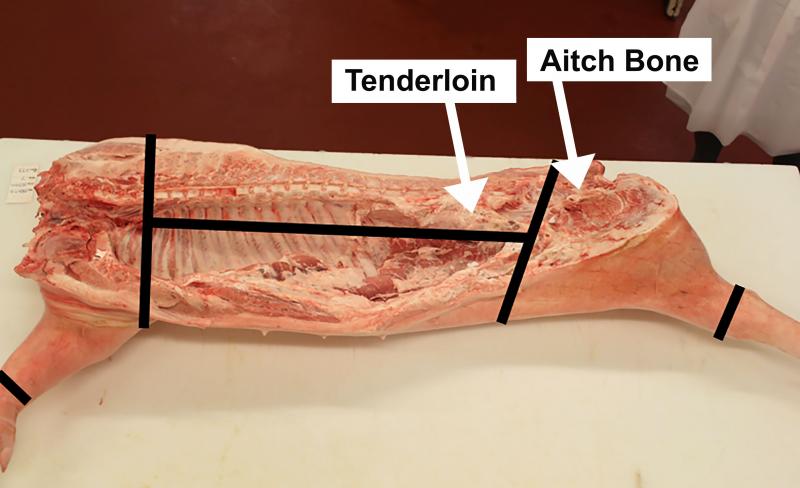
If you do not have access to those facilities, the carcass needs to be fabricated (cut) into manageable pieces. Use Figure 2 as a guide to help you make these cuts. Lay one side of the carcass down on a clean surface so the skin side is down. If you do not wish to keep the feet, they can be cut off using a saw above the knee or hock joint of each leg. Then, locate the 2nd rib counting from the anterior end (closest to the head). Using a saw, cut through the backbone and sternum between the 2nd and 3rd ribs. You will also have to saw through the shoulder blade which lays below the backbone. Once you have cut through the bones, you can finish removing the shoulder with a clean boning knife.
Next, locate the aitch bone, which is a teardrop shaped bone at the ham. Using a saw, make a cut perpendicular to the length of the back leg about 2 inches towards the head from the aitch bone. You will cut through the last few vertebrae and the pelvic bone. Again, once you have cut through the bones, finish the cut with the boning knife.
Finally, separate the belly from the loin. Start by looking at the end the ham was removed from. Locate the tenderloin, which is a small round muscle that sits just under the backbone. At the ham end, make a mark at the edge of the tenderloin. Then, on the shoulder end of the loin, locate a spot about 1-2 inches toward the belly from where the ribs meet the backbone and make a mark. Then return to the ham end. Using a knife, cut towards the mark you made on the shoulder end. You should get about half-way through the cut before reaching the ribs. Then, use a saw to cut through the ribs and finish the cut with a knife.
You should now have 4 manageable pieces of a pork carcass to cool. Do the same thing to the other side. Then wrap each piece in plastic wrap and place into iced down coolers for 24 hours. Be cautious to not over pack the coolers. Leave space around each cut for ice to ensure it cools properly.
The black lines on Figure 2 indicate the locations to cut the carcass into primal cuts for chilling.
Step 18. Disposal of inedible by-products.
The organs, hide, head, feet, or trim you removed from the carcass should be disposed of properly. If you have access to an animal disposal pit, you can dispose of it there. You can also contact your local land fill to see if they allow animal disposal.
Additional Resources
- Suggested Reading:
- Danforth, A. (2014). Butchering poultry, rabbit, lamb, goat, pork: the comprehensive photographic guide to humane slaughtering and butchering. North Adams, MA: Storey Publishing.
- Videos:
- Butchering Pigs: 10 Steps from Alive to Our Bellies, Justin Rhodes.
- How to Skin a Pig or How to Skin a Hog, The Bearded Butchers.