Written collaboratively by Gary A. Anderson and Xufei Yang.
Wind Damage to Grain Bins
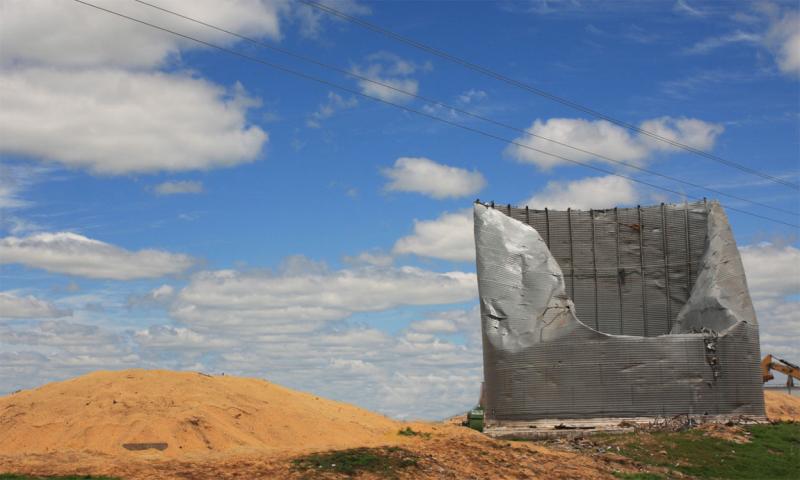
Due to its high profile and light structure, a metal grain bin is susceptible to wind damage. Most grain bins in the United States are designed to withstand wind gusts of up to 105 mph, following ASCE 7-10 wind load calculation recommendations (Note: ASCE refers to the American Society of Civil Engineers). Additional wind rings can be added to further improve the wind resistance of a bin structure. However, this comes with extra cost.
Metal grain bins are designed to carry load from grain. The round shape puts the metal wall sheeting in tension as the grain pushes outward. The steel sheets under this loading behave like a bundle of wires that are hard to pull apart. Pushing inward on the bin wall by wind tends to bend the sheet, and bending a wire is easier than pulling it apart. Wind moving through a group of bins can cause the wind to accelerate between and around bins, significantly increasing wind load. Bin spacing can impact wind damage.
Wind load on a bin pushes in on the windward side of the bin, while it pulls out away from the bin in the remaining directions. Wind, in effect, tries to crush the bin, pulling and pushing it out of round. Empty bins are more susceptible to wind damage than full bins, especially towards the top of the bin. Wind tends to push the windward roof inward, collapsing it into the bin, while it can produce a suction on the leeward side of the roof. The damage caused by wind can look similar to an aggravation of damages due to other causes, like improper filling or emptying of a bin, poor maintenance, air inlet/outlet plugging and improper aeration of the grain.
Bin Inspection After a Windstorm

Some people inspecting grain bins recommend starting at the top of the bin. This type of inspection often is related more to ensuring that the bin is serviceable and capable of properly storing the intended grain. It is recommended that, for a bin that may not be structurally sound, the inspection should begin outside of the bin and at ground level. Bin inspection can take the following steps.
Steps for Inspection
Step 1
Start from outside of the bin, far enough away so that you can see the top of the bin. Walk completely around the bin to see if the walls are straight, the eave is parallel to the ground and no wall or roof sheets are missing or badly deformed. A bin can slide on its foundation, so check if the bin appears to be centered on the concrete foundation. Also, check if doors are intact and not out of square.
Step 2
Move in close to the bin, walk around and check the foundation of the bin:
- Does the sealant between the bin wall and the concrete foundation look to be intact? If the sealant is damaged, the wall sheets, bin or anchors may have failed.
- Are any anchor bolts or anchor plates missing, bent, broken or corroded?
- Does the concrete show any cracks that indicate that the anchor bolt is not being held securely? The cracks can be either on the surface of the foundation or along the outside edge of the foundation.
- Also, look for cracks that are away from the anchor bolts. Cracks an eighth of an inch or more wide should be sealed.
- Are there any places where two sections of the concrete foundation are of different heights (more than an inch)? This could occur at construction joints, cracks in the foundation, etc. The uneven foundation can cause stress on the bin walls.
While walking around, check the bin walls and ground:
- Are there bolts and/or bolt heads laying on the ground? If they are, locate where the bolts/bolt heads came from. They should be replaced. Compare the grade marks of the bolts to ensure they are all of the same grade. Replacement bolts should be the same or higher grade. If using a higher grade bolt, make sure it is not brittle.
- Are the bolts tight? Tighten loose bolts if found. Some bin manufacturers specify a torque for tightening bolts. If the specification is available, follow the bolt torque guidelines.
- Are the wall sheets buckled or flattened? If so, it may indicate overloading of the sheet and loss of strength. The sealant between sheets should be intact too.
- Are there cracks in the sheeting around bolts or away from the bolts? Sheet failure around bolts can be caused by bearing where the metal piles up behind the screw or steel sheet cracking and pulling apart around the bolts. If the crack extends through several bolts, the sheet may fail suddenly.
- Inspect door openings and other openings in the wall. The opening frame should be square with no frame member buckling. The welds should not have cracks or otherwise show signs of failure.
- Stiffeners (vertical members attached to the bin wall) should be straight. The bolts attaching the stiffener to the wall, wind rings and foundation should be present and tight. Bolts connecting stiffener sections should be tight. Bolt bearing and shear (bolt head broke off) damage should not be present. Bolts should be present and tight in stiffener splices with no steel or bolt damage visible. The base plate connecting the stiffener to the foundation should sit flush on the foundation with shims installed as needed (anchor bolts have previously been inspected).
- Wind rings may be used on the bins to help keep the bin round. The wind ring bolt connections attaching the ring to the wall or stiffeners should be present and tight. The rings should be round in shape and not deformed.
Step 3
When the bin wall exterior inspection is completed, and the bin is considered safe, you may enter the bin, assuming it is empty.
- From the doorway, examine any interior of the bin walls for damage, same as the exterior of the wall having been examined. Stiffeners and wind rings, if present on the inside of the bin, should be checked, as well as the associated clips and bolts.
- If a raised aeration floor is installed, check if the floor attachment to the wall is damaged and if all bolts are present. Also, look for wall deformation near the raised floor line.
- Look at the inside of the roof to see if the roof sheets look damaged (bent). If the roof is attached to the wall through clips and bolts, inspect the bolts and clips for damage and tightness.
Step 4
Move to the top of the bin.
- While climbing the ladder, look for loose attachments of the ladder to the bin wall. Tighten and replace bolts as necessary.
- Note damaged ladder rungs and see if the wall near a damaged rung is also damaged.
Step 5
When you arrive at the roof level, look for:
- Damaged vents will affect the aeration system.
- Bent or deformed roof sheeting ribs. Are the sheets running evenly down the roof slope?
- Are the roof-to-wall clips present and bolts present and tight that connect the wall to the roof sheeting?
- Are supporting rings round and secured in place with tight bolts if present on the roof?
- Is the door for the top opening in the bin roof bent or dislocated relative to the opening in the roof? The seal should be intact and capable of sealing so moisture can not enter the bin.
Step 6
Inspect the electrical system.
- Check junction boxes at the fan and all controls.
- Is the electrical conduit damaged? Are conduit joints sealed and intact? Does the conduit run straight, or is it pulled away from a straight run?
- Are connections to the fan motor and all controls and sensors intact and sealed?
Other Useful Notes
Bin Corrosion
Corrosion is not caused by wind. But it can impact the resistance the bin has to wind loads. Improper aeration and conditioning of the grain can lead to corrosion of the sheeting, bolts, stiffeners, anchors, anchor plates, wind rings, etc. Corrosion should be repaired and bins cleaned often. Older bins are also more prone to wind damage. The tendency of the bin towards wind damage as it ages can be attributed to reduced protective coating and steel thickness due to grain movement over bin components. Loading cycles can also fatigue the bin components over time. Improperly stored grain can cause moisture problems that reduce protective coating thicknesses and metal thickness, compromising bin strength against wind load. Proper storage of grain is important in reducing wind damage to a bin.
Why do we need to inspect?
- Ensure the safety of people working around the bin.
- Maintain the bin in a serviceable condition so that it serves the owners' needs (safely store and condition grain).
- Extend the life of the bin by reducing rust, keeping bolts tight and replacing damaged/worn components. The older a bin is, the more likely it is to fail.
- Maintain a record to show that you are inspecting and servicing/repairing the bin as needed so you have a record if you have to file an insurance claim.
Reporting and repairing damage
- Document with pictures of all possible damage from more than one angle. Take legible and complete notes. You could be called upon to discuss the damage to your bin many days later than when the bin was inspected. Poor notes can lead to poor recall of bin damage.
- Contact your insurance company.
- Have a millwright and/or engineer inspect the bin damage and recommend repairs. Do not make any repairs by yourself without knowing the structural problems the bin has and the solutions to the problems.
Additional Resources
For more information, view some of these useful resources:
- Assessing Grain Bin Damage. Iowa State University Extension.
- Grain bins can be built to sustain hurricane-force winds, but at a cost. Progressive Farmer.
- Determining pressure coefficients due to wind loading on grain bins. The University of Florida. Note: It is a Ph.D. dissertation containing many technical details. Pages 21-32, however, well elaborate on grain bin wind loads.
- Wind Storm Damage to Grain Bins and Nearby Structures. Note: Dr. Christine Wittich at the University of Nebraska-Lincoln has conducted grain bin wind damage research for years. She had a few talks about bin structural integrity impacted by straight-line winds and is soliciting photos of bin damage.